 Save to Pinterest
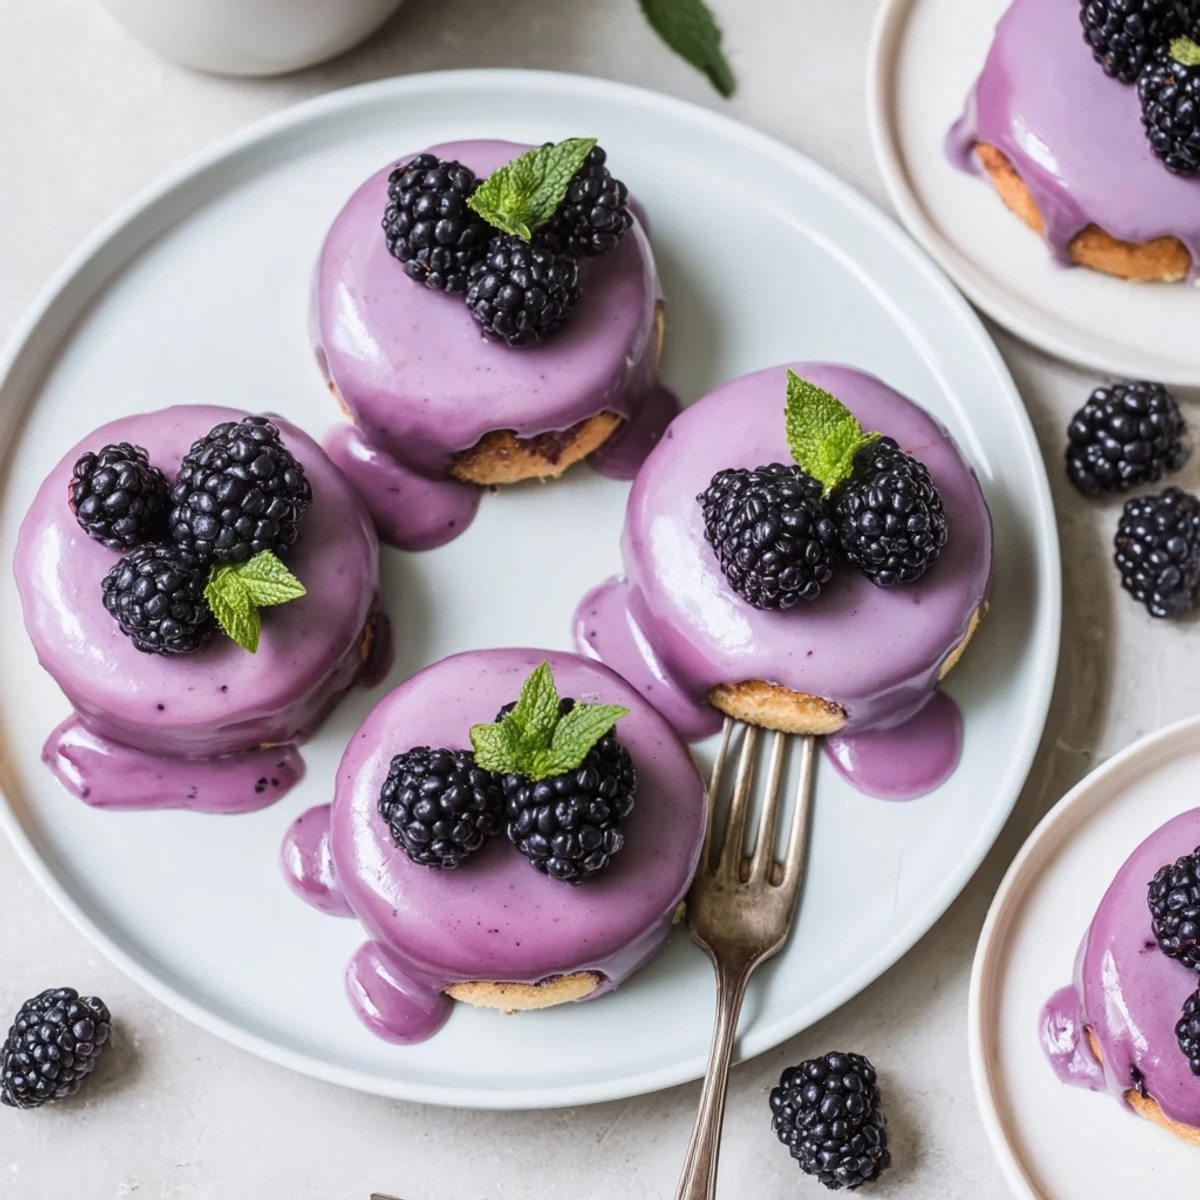
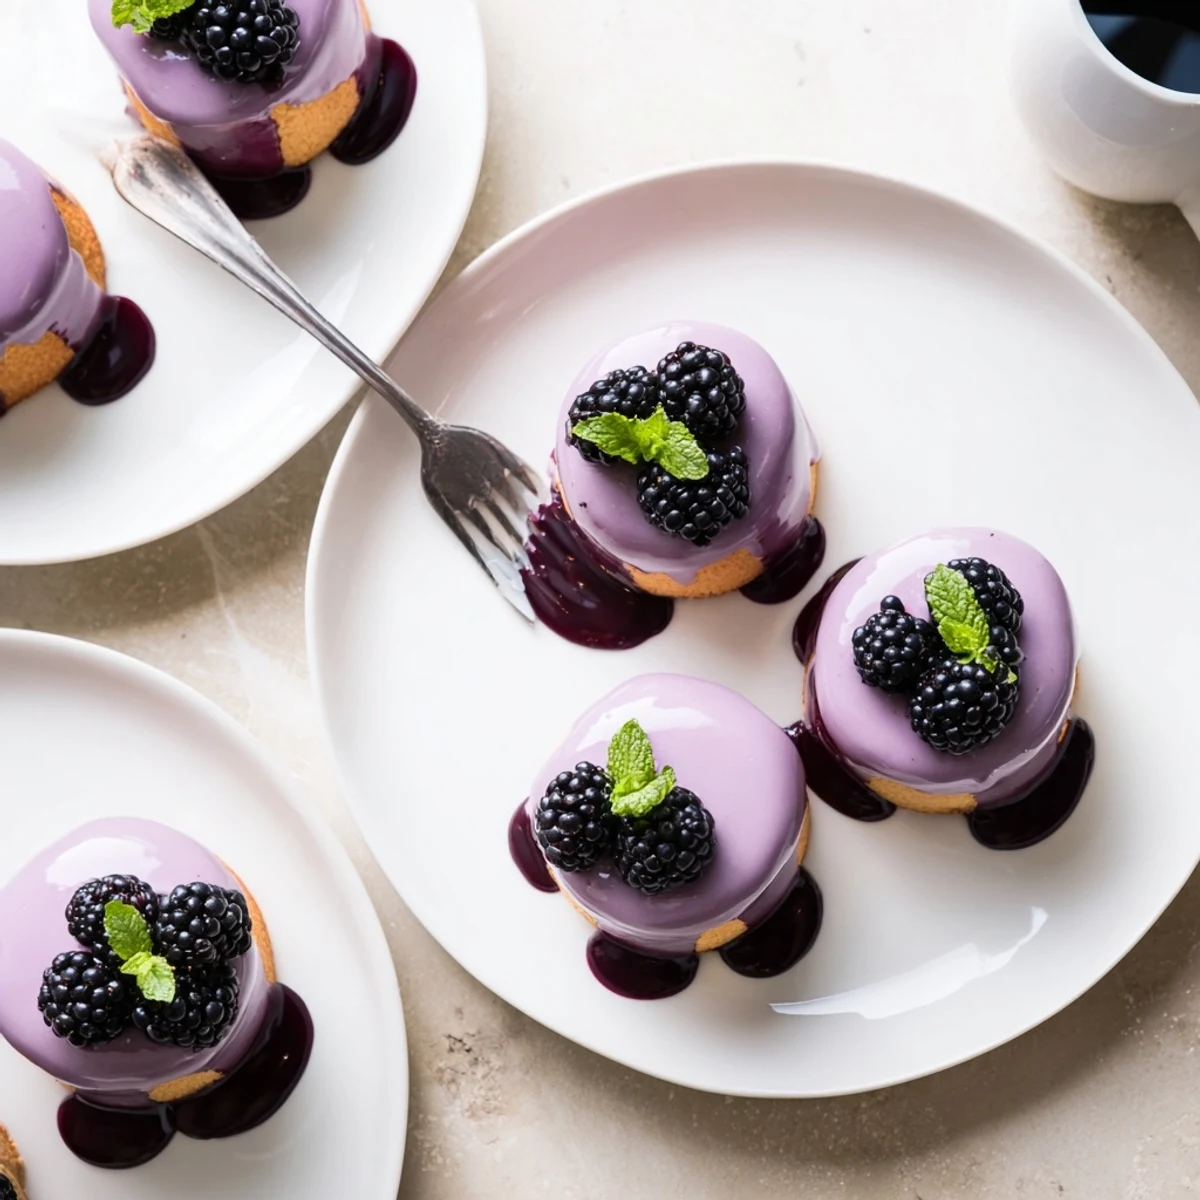
 These elegant mini cakes combine a tender vanilla sponge base with an incredibly light and airy blackberry mousse. The mousse gets its signature texture from freshly whipped heavy cream folded into a vibrant blackberry puree sweetened with sugar and brightened with lemon juice. A glossy blackberry glaze creates a stunning mirror-like finish that catches the light beautifully.
Each individual cake takes about 5 hours from start to finish, though most of that time is passive chilling. The sponge bakes quickly in just 10-12 minutes, while the mousse requires careful temperature control when incorporating the gelatin and folding in the whipped cream. The final glaze needs to cool slightly to achieve the perfect pouring consistency.
The result is a sophisticated dessert that balances sweet-tart blackberry flavor with rich creaminess. Fresh blackberries and edible flowers make for a beautiful presentation that's ideal for dinner parties, summer celebrations, or afternoon tea.
The first time I attempted individual mousse cakes, my kitchen looked like a crime scene. Purple streaks everywhere, glaze that refused to set, and sponge layers that somehow managed to both burn and remain raw simultaneously. These blackberry mini cakes are what happened after I finally learned that patience, not speed, creates those silky, mirror-like finishes you see in pastry shops.
I made these for my sisters engagement dinner last summer. She cried when she saw them lined up on the dessert tray, though that might have been the champagne talking. The best moment was watching her new fiancé try to discretely eat two before anyone noticed, leaving telltale purple glaze on his white shirt.
Ingredients
- 2 large eggs: Room temperature eggs whip up much faster and create that signature sponge texture that practically floats in your mouth
- 60 g granulated sugar: This precise amount sweetens without weighing down the delicate crumb
- 60 g all-purpose flour: Sift it twice for extra aeration or use gluten-free blend if needed
- 1/4 tsp vanilla extract: Pure vanilla makes such a difference in simple sponges where every flavor shines
- Pinch of salt: Just enough to wake up all the other flavors
- 300 g fresh or frozen blackberries: Frozen work perfectly here and often release more juice during cooking
- 80 g granulated sugar: Balances the natural tartness of blackberries without masking their fresh taste
- 2 tbsp lemon juice: Brightens the blackberry flavor and helps the gelatin dissolve properly
- 6 g (2 sheets) powdered gelatin or leaf gelatin: Leaf gelatin gives a slightly silkier result but powder works beautifully too
- 250 ml heavy cream, cold: The colder your cream, the faster it whips and the more stable your mousse will be
- 100 g blackberry puree (strained): Use leftover puree from the mousse step to reduce waste
- 30 g granulated sugar: Just enough sweetener to create a glossy finish
- 2 g (1 sheet) gelatin: Creates that professional pastry-shop shine that makes people ask where you ordered them
- Fresh blackberries: For garnish, pick the most perfect ones you can find
- Edible flowers or mint leaves: Completely optional but makes these look absolutely stunning
Instructions
- Prep and Preheat:
- Set your oven to 350°F (175°C) and line a 9x13-inch baking sheet with parchment paper, pressing it into the corners so the sponge releases easily later.
- Whip the Sponge Base:
- Beat eggs and sugar with an electric mixer until the mixture turns pale and thick, about 5 full minutes—you should be able to briefly leave trails on the surface when you lift the beaters.
- Fold Gently:
- Sprinkle flour, vanilla, and salt over the egg mixture and fold with a spatula using gentle, deliberate motions until just combined, being careful not to deflate all those air bubbles you worked so hard to create.
- Bake the Foundation:
- Spread batter evenly across your prepared sheet and bake for 10–12 minutes until lightly golden and springy to the touch—overbaking will make cutting circles difficult later.
- Cut and Place:
- Let the sponge cool completely, then use a 2.5-inch round cutter to cut 8 perfect circles, placing each at the bottom of silicone molds or lined muffin tins.
- Bloom the Gelatin:
- Place gelatin sheets in cold water for 5 minutes to soften, or bloom powdered gelatin according to package directions.
- Make Blackberry Magic:
- Combine blackberries, sugar, and lemon juice in a saucepan and simmer over medium heat until berries are completely soft, about 5–7 minutes, releasing all that gorgeous purple juice.
- Strain and Infuse:
- Puree the mixture and strain through a fine sieve, pressing firmly to extract every drop of liquid while removing seeds.
- Combine and Cool:
- While the puree is still warm, add softened gelatin and stir until completely dissolved, then let it cool to room temperature—it should feel barely warm to the touch.
- Whip Cream:
- Whip cold heavy cream to soft peaks, where the cream holds its shape but still droops slightly from the whisk.
- Make Mousse:
- Gently fold the cooled blackberry mixture into the whipped cream using a spatula, making deliberate motions until fully incorporated and smooth.
- Fill and Chill:
- Spoon or pipe mousse over each sponge base in the molds, smoothing the tops carefully, then refrigerate for at least 4 hours until completely set.
- Prepare Glaze:
- Bloom your remaining gelatin, then gently heat blackberry puree and sugar until warm and dissolved before stirring in gelatin.
- Cool and Pour:
- Let the glaze cool until slightly thickened but still pourable, like warm honey, before unmolding your chilled cakes onto a rack over a tray.
- Glaze and Garnish:
- Pour glaze over the tops, letting it cascade down the sides naturally, then chill briefly to set before topping with fresh blackberries and edible flowers.
 Save to Pinterest
 My aunt actually asked for the recipe after trying them, which is the highest compliment possible since she usually politely desserts and never asks how anything was made. Now theyre her go-to whenever she needs to impress someone, though she still calls me every time shes making them to doublecheck the gelatin amounts.
Making Ahead
You can prepare the sponge layers up to two days in advance, wrapped tightly in plastic wrap at room temperature. The mousse cakes can be assembled and chilled 24 hours ahead, but add the glaze no more than 4 hours before serving to maintain that glossy finish.
Working with Gelatin
If youve never used leaf gelatin before, youre in for a treat—it dissolves more reliably and produces a smoother texture than powder. Just remember that different brands have different strengths, so always check your package instructions for the equivalent blooming time.
Troubleshooting Your Glaze
If your glaze ends up too thick to pour, gently reheat it for just a few seconds at a time. Too thin and it slides right off? Pop it in the fridge for 5 minutes and stir again before pouring.
- Strain your glaze through a fine sieve before using to catch any undissolved gelatin lumps
- Warm your knife under hot water and wipe dry between cuts for the cleanest slices
- If any air bubbles appear in the glaze after pouring, lightly pass a kitchen torch over the surface to pop them
 Save to Pinterest
 There is something deeply satisfying about serving desserts that look like they came from a professional bakery but only you know how surprisingly straightforward they were to make. Enjoy the moment when everyone assumes you spent all day in the kitchen.
Frequently asked questions about this recipe
- → Can I use frozen blackberries instead of fresh?
-
Yes, frozen blackberries work perfectly in both the mousse and glaze. Thaw them completely before cooking, and expect slightly more liquid that may need additional reduction time. The flavor remains excellent and the color will still be vibrant.
- → How far in advance can I make these mini cakes?
-
The assembled mousse cakes can be made up to 2 days ahead and stored refrigerated. Add the glaze and garnish within 24 hours of serving for the best appearance. The sponge bases can be baked and frozen for up to 2 weeks before assembling.
- → What can I use instead of gelatin?
-
Agar-agar can substitute for gelatin at a 1:1 ratio, though the texture may be slightly firmer. For a completely different approach, use vegetarian gelling sheets or skip the setting agent entirely and serve as parfaits in glasses.
- → Do I need special molds?
-
Silicone molds work best for easy unmolding, but lined muffin tins are a great alternative. Just ensure each cavity holds about 1/2 cup. Small glass ramekins or custard cups also work if you plan to serve directly in the vessel.
- → Why did my mousse turn out grainy or separated?
-
This usually happens when the blackberry mixture is too warm when folded into the whipped cream, or when the cream is overwhipped. Always cool the fruit puree to room temperature, whip cream only to soft peaks, and fold gently with a spatula to maintain airiness.
- → Can I make these gluten-free?
-
Absolutely. Substitute the all-purpose flour with a 1:1 gluten-free flour blend in the sponge. The texture will remain tender and light. Double-check that your gelatin is certified gluten-free if needed for dietary restrictions.
