 Save to Pinterest
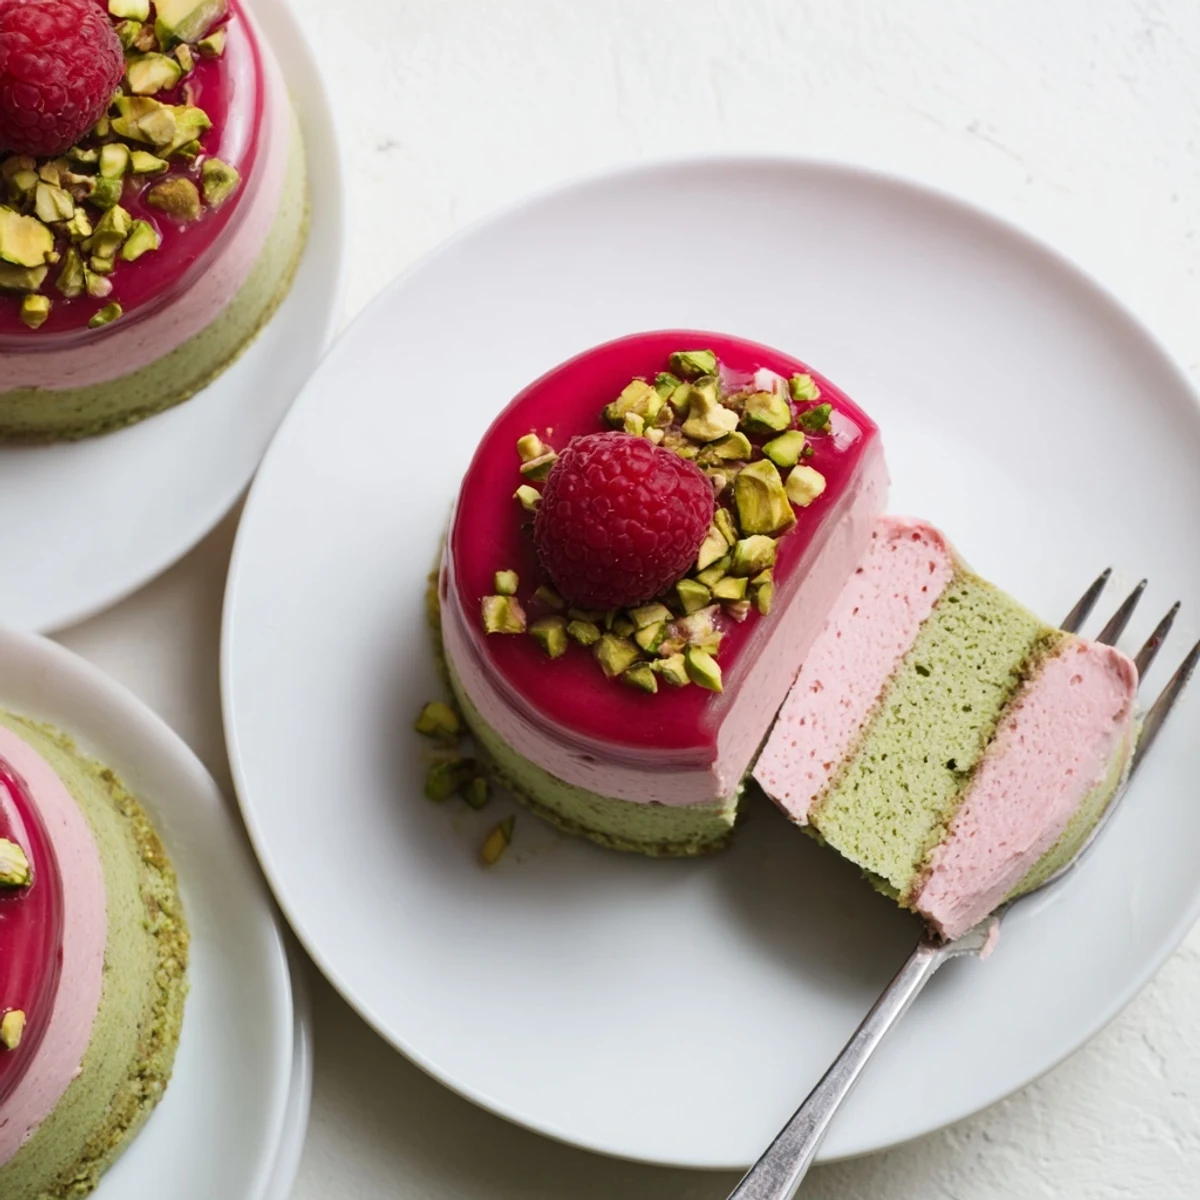
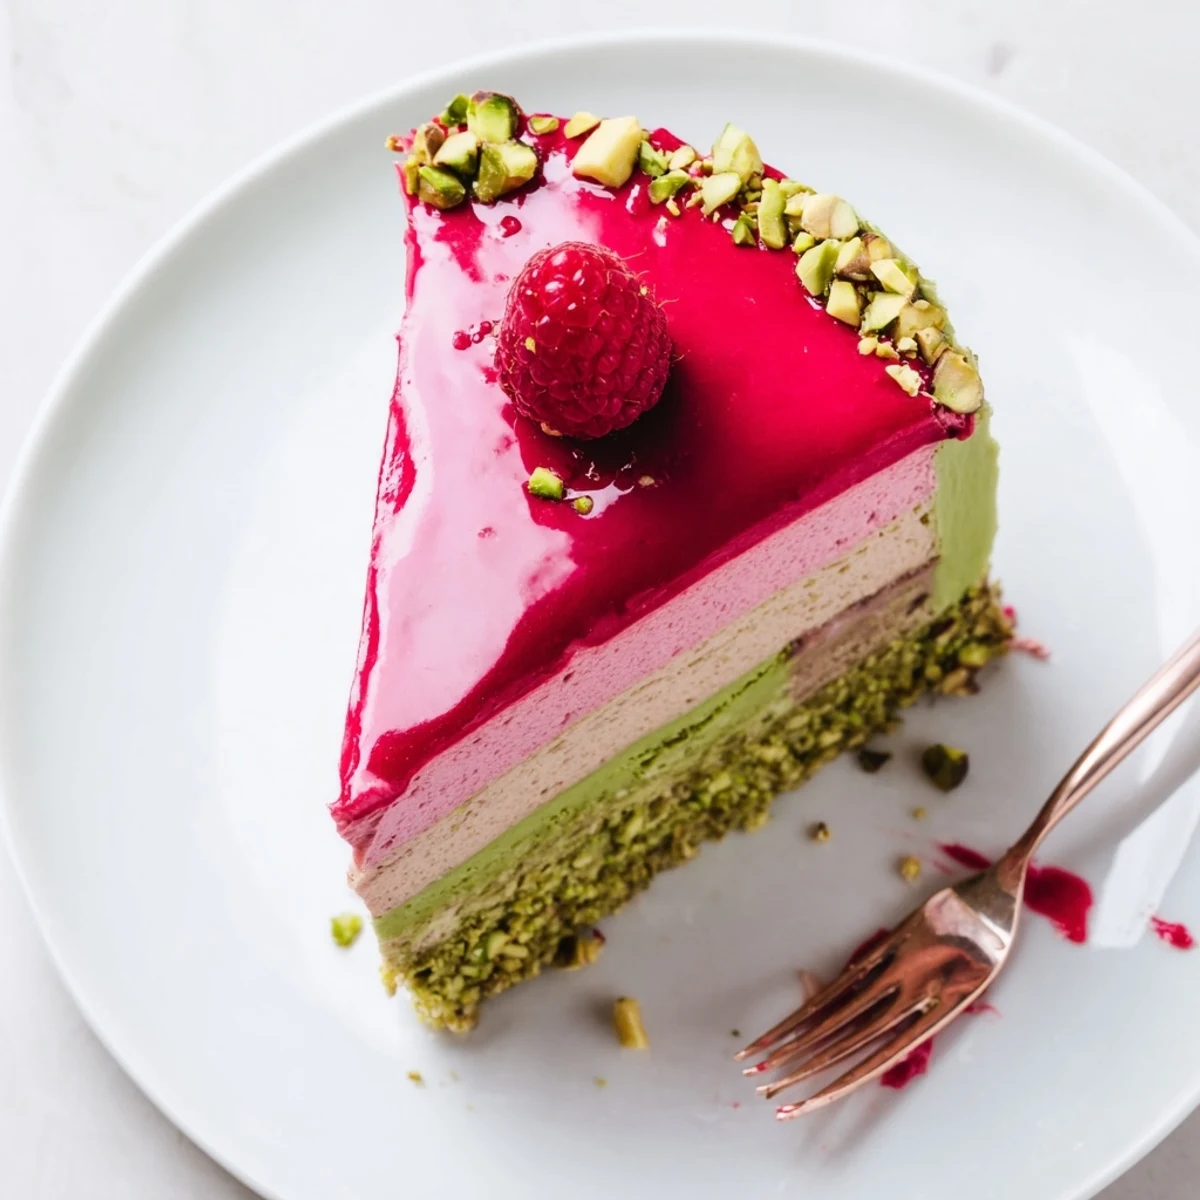
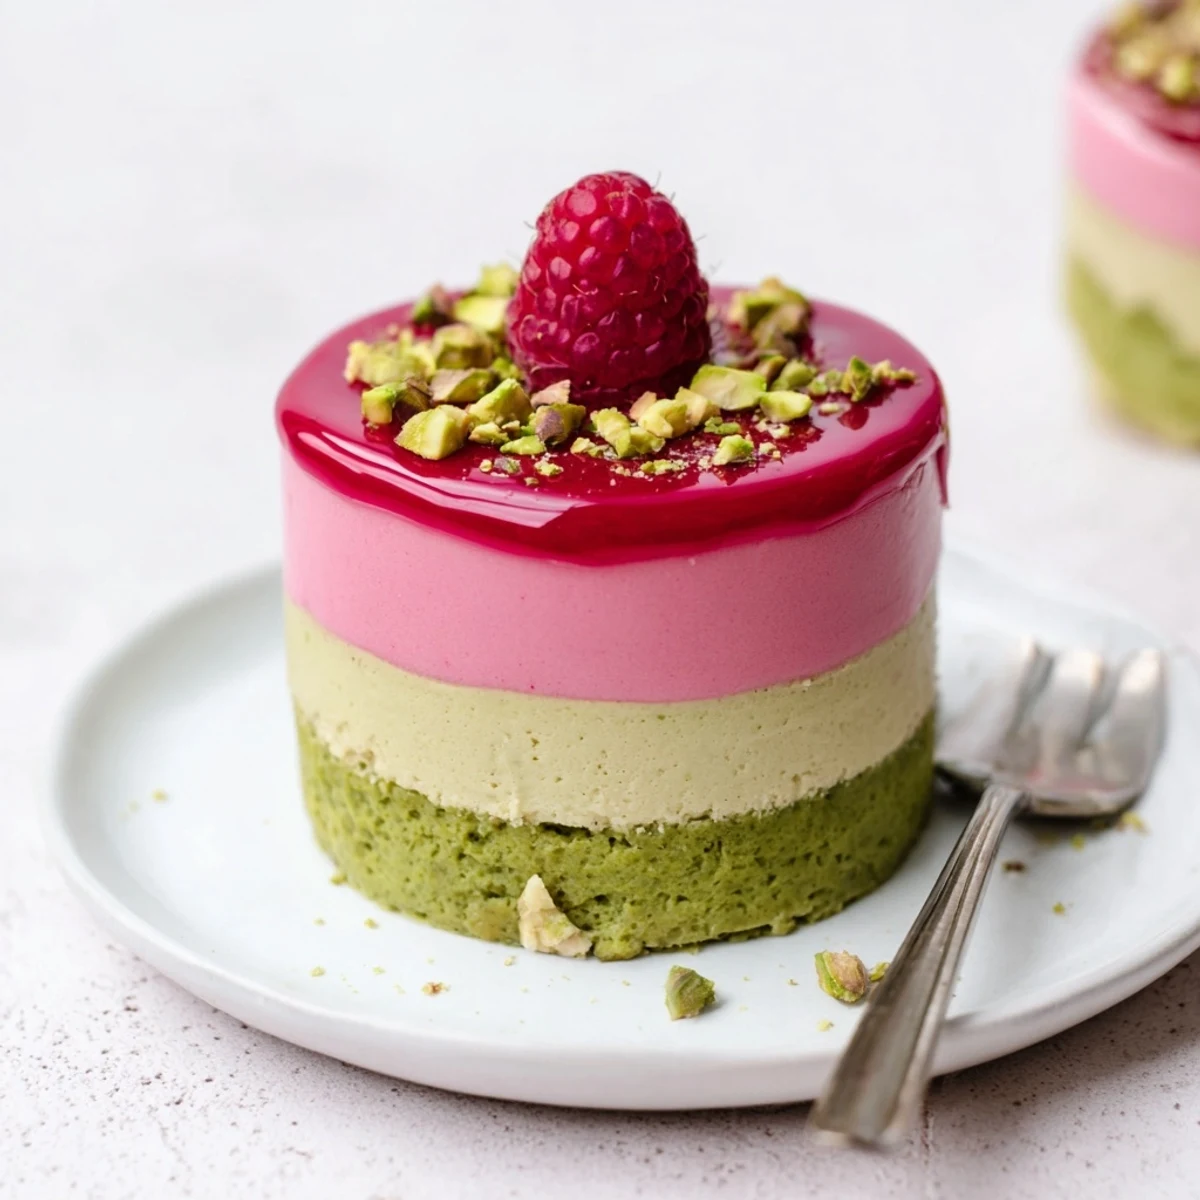
 These refined individual desserts combine three luxurious layers: a tender pistachio sponge base, silky pistachio mousse infused with nutty paste, and bright raspberry mousse made from fresh fruit. The glossy raspberry glaze adds a professional finish while chopped pistachios and whole berries provide texture and visual appeal. Though requiring several steps and chilling time, these mini cakes can be prepared ahead for elegant entertaining.
The first time I made these mini raspberry pistachio mousse cakes was for my sister's birthday dinner last spring. I spent the entire day hovering over the kitchen counter, terrified the layers wouldn't set properly. When I finally unmolded them and poured that glossy raspberry glaze over each tiny cake, my hands were literally shaking. They turned out so beautiful that nobody believed I'd made them myself.
I served these at our annual summer garden party and watched my friend Sarah take her first bite. Her eyes went wide and she grabbed my arm like I'd just handed her gold. Later she texted me at midnight asking for the recipe because apparently her husband couldn't stop talking about them.
Ingredients
- 60 g pistachios finely ground: I've learned the hard way that processing pistachios too long turns them into butter so pulse carefully and watch closely
- 40 g all-purpose flour: This provides just enough structure to hold those delicate mousse layers together
- 2 large eggs: Room temperature eggs will incorporate air much better for that fluffy sponge base
- 60 g granulated sugar: Don't reduce this sugar or your sponge won't have proper structure
- 30 g unsalted butter melted: Let this cool slightly before folding in so you don't accidentally cook your eggs
- 1/2 tsp baking powder: Fresh baking powder makes all the difference in lift here
- Pinch of salt: This tiny amount wakes up all the pistachio flavor
- 150 ml whole milk: I've tried lower fat milk and it really affects the mousse texture
- 100 g pistachio paste: The good stuff makes these cakes sing so don't skimp on quality
- 3 egg yolks: Save those whites for macarons or meringues another day
- 45 g granulated sugar: This balances the richness of all that cream
- 3 sheets gelatin: Leaf gelatin gives such a cleaner result than powdered
- 200 ml heavy cream whipped: Cold bowl cold whisk cold cream this is nonnegotiable
- 200 g fresh or frozen raspberries: Frozen work perfectly fine if fresh aren't in season
- 60 g granulated sugar: Adjust this slightly depending on how tart your berries are
- 2 tbsp lemon juice: This brightens the raspberry flavor beautifully
- 3 sheets gelatin: Same as above for consistency
- 200 ml heavy cream whipped: Again temperature matters immensely here
- 100 g raspberry purée strained: Take the time to strain properly seeds ruin that silky finish
- 50 g granulated sugar: This glaze needs to be slightly sweet to balance the tart berries
- 2 sheets gelatin: Less gelatin here keeps the glaze pourable not rubbery
- 30 g chopped pistachios: Toast these lightly for an incredible aroma boost
- Fresh raspberries: These little jewels make the simplest but most beautiful garnish
Instructions
- Prepare your kitchen and tools:
- Preheat that oven to 175°C and line your baking tray with parchment paper because we're building something beautiful today and preparation is everything
- Bake the pistachio sponge foundation:
- Beat those eggs and sugar until they're pale and practically giggling with air then gently fold in ground pistachios flour baking powder and that pinch of salt before stirring in melted butter and spreading evenly to bake for 12 to 15 minutes until lightly golden
- Craft the pistachio mousse layer:
- Heat milk with pistachio paste until just barely simmering then whisk egg yolks and sugar separately before gradually pouring that hot pistachio milk over yolks while whisking constantly and returning everything to the saucepan to cook gently until thickened without boiling then stir in soaked gelatin and let cool before folding in whipped cream
- Create the vibrant raspberry mousse:
- Blend those raspberries with sugar and lemon juice then strain out every single seed because texture matters warm a third of the purée to dissolve the soaked gelatin mix it back into the remaining purée let it cool to room temp and gently fold in that whipped cream
- Assemble the layered magic:
- Place a sponge circle in each mini cake ring pipe or spoon pistachio mousse over top smooth the surface and refrigerate for 30 minutes to set slightly before adding raspberry mousse smoothing the tops and freezing for at least 3 hours
- Prepare the glossy raspberry glaze:
- Warm raspberry purée and sugar together then remove from heat and stir in soaked gelatin until melted and let it cool until slightly thickened but still pourable like honey
- Glaze and finish your masterpiece:
- Unmold those frozen cakes place them on a wire rack and pour raspberry glaze over each one to coat completely then transfer to the refrigerator and let thaw for 2 hours before serving
- Add the final touches:
- Scatter chopped pistachios and fresh raspberries over each cake right before serving because that contrast of textures makes everything better
 Save to Pinterest
 These became my go to dinner party dessert after that first success. There's something so satisfying about serving something that looks like it came from a professional bakery but actually came from your own kitchen.
Working Ahead Like A Pro
I've learned that making the sponge and mousses a day ahead makes the final assembly so much less stressful. Wrap that cooled sponge tightly in plastic and store each mousse separately in the refrigerator then assemble when you're ready.
Getting That Perfect Glaze consistency
The glaze temperature is everything here. Too warm and it slides right off the cakes too cold and it globs unevenly. I've found that 30 to 35°C is the sweet spot where it coats smoothly and sets beautifully.
Making These Your Own
Once you're comfortable with the technique these little cakes are incredibly adaptable. The pistachio sponge pairs beautifully with so many combinations and I love experimenting with different seasonal fruits.
- Try swapping blackberries or passion fruit for raspberries when they're in season
- Hazelnut sponge with chocolate mousse creates this incredibly sophisticated flavor profile
- Add a thin layer of jam between sponge and mousse for an extra burst of fruitiness
 Save to Pinterest
 Every time I serve these now I think back to that first nervous attempt. Watching people cut into these little cakes and seeing those gorgeous layers always makes me feel like a kitchen magician.
Frequently asked questions about this recipe
- → Can I make these ahead of time?
-
Yes, these freeze beautifully for up to 2 weeks before glazing. Thaw in refrigerator for 2 hours before adding the final glaze layer.
- → What size molds work best?
-
Silicone dome molds or ring molds measuring 6 cm (2.5 inches) in diameter yield 8 individual portions. Adjust size accordingly if using different mold dimensions.
- → Can I use frozen raspberries?
-
Frozen raspberries work perfectly for the mousse layer. Thaw completely before blending and strain to remove excess liquid and seeds.
- → Where can I find pistachio paste?
-
Look for pistachio paste in specialty baking stores, gourmet markets, or online retailers. High-quality almond paste can be substituted with slight flavor variation.
- → Why must the cakes be frozen before glazing?
-
Freezing ensures firm structure during unmolding and glazing. The cold surface helps the glaze set evenly without sliding off or creating drips.
- → How long do these keep once assembled?
-
Store glazed cakes in the refrigerator for up to 3 days. The glaze may weep slightly over time, so garnish with pistachios and fresh berries just before serving.
