 Save to Pinterest
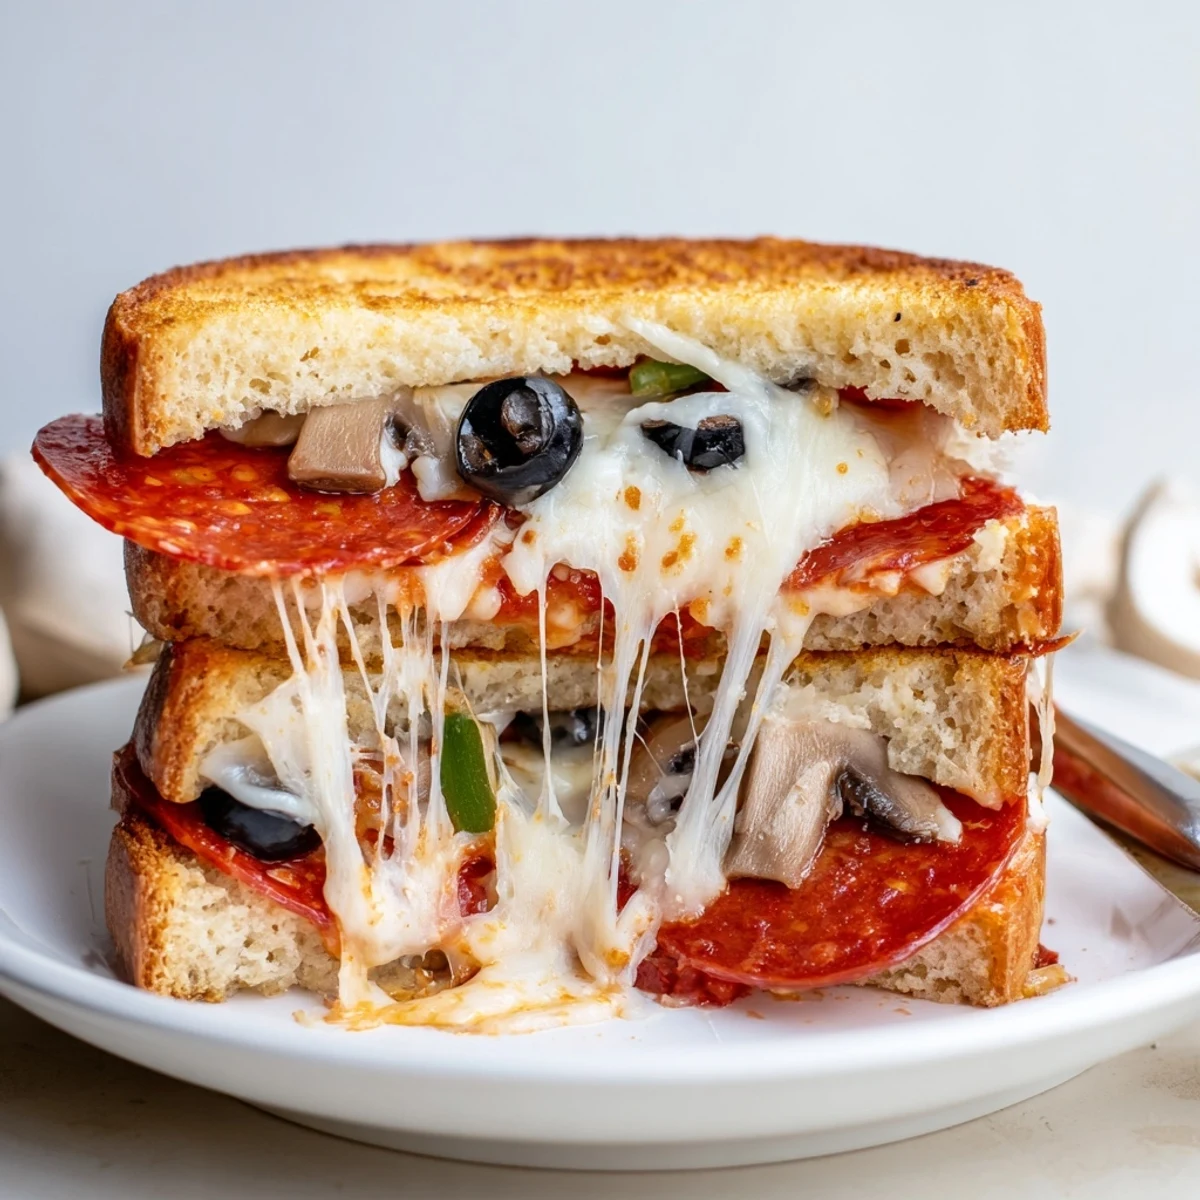
 Make crisp, golden pizza pockets using sandwich bread and a pie iron over a campfire or stovetop. Butter each slice, spread sauce, add shredded mozzarella and chosen toppings, seal the sandwich and cook about 3–4 minutes per side until the crust is evenly browned and cheese is fully melted.
For variations, swap in gluten-free bread, add cooked sausage or fresh basil, or try pesto in place of sauce. Use a pastry brush to manage butter, tongs for safety, and let pockets cool slightly before serving.
There's something thrilling about the impatience that builds when you can hear the pie iron sizzle over a campfire, the smoky air mingling with cheesy aromas. I found out about pizza pockets on a last-minute camping trip, when a friend dusted off a pie iron that had been living in her garage for years. She tossed together whatever sandwich fixings we had, but that melted cheese and crisped bread changed how I saw campfire cooking forever. Since then, I've crafted this pie iron pizza pocket recipe for every outdoor occasion, and it never fails to bring a chorus of happy crunches.
One afternoon by the lake, I made these pizza pockets for a hungry crowd after a long paddleboarding session. Everyone gathered around the campfire with dripping swimsuits and a handful of toppings so they could build their own. Watching people experiment—someone snuck in pineapple; another layered on a little too much cheese, and declared it perfect—made the meal feel like a communal adventure. Shared laughter over whose pocket leaked the most cheese sealed the memory for me.
Ingredients
- Bread: You want soft sandwich bread so it presses and seals well—I've learned both white and whole wheat work, just avoid thick rustic slices.
- Pizza sauce: Go with jarred or homemade, but spread it gently so you don't soak through the bread.
- Mozzarella cheese: Shredded melts evenly and clings to the toppings, but slice if you prefer bigger cheesy pockets.
- Pepperoni or salami (optional): For a classic bite, but feel free to skip for a vegetarian version or swap in cooked sausage or ham.
- Black olives, bell peppers, mushrooms: I pick what needs using in the fridge—chop toppings small for best melting and sealing.
- Dried Italian herbs (optional): A sprinkle delivers that classic pizza aroma (try fresh basil after cooking for a twist).
- Butter: Clear, melted butter ensures crisp, golden edges and helps the pockets pop out of the iron without sticking.
Instructions
- Get the pie iron hot:
- Place your pie iron over the fire or stove and let it preheat for 2-3 minutes—you'll know it's ready when you can feel warmth hovering above it.
- Butter and assemble:
- Brush one side of each bread slice with melted butter, then lay half of them (butter side down) on your work surface so they're ready for toppings.
- Sauce and cheese:
- Spread a thin, even layer of pizza sauce over the bread, sprinkle on mozzarella, and scatter your favorite toppings to keep the fillings balanced.
- Close the sandwiches:
- Top with the other slices of bread, butter side up, making sure the edges line up so nothing escapes during cooking.
- Clamp and trim:
- Gently place the sandwich in the pie iron, latch it shut, and use a knife to trim away bread sticking out—this makes for an even pocket.
- Cook over the fire:
- Rest the clamped iron over medium campfire heat, cooking 3–4 minutes per side; rotate if needed and listen for the sizzle as the crust turns golden and the cheese melts inside.
- Serve and enjoy:
- Open the iron carefully (watch for steam), lift out the pizza pocket, let it cool for a minute or two, then dig in while the cheese is still stringy.
 Save to Pinterest
 There was a night when someone brought their guitar, and as we passed around a batch of fresh pizza pockets, we all paused mid-song to admire the cheese pull—momentarily silent and grinning in firelight. It’s small experiences like that, sticky hands and laughing at our failed attempts to avoid messes, that turned these into more than just a meal for me.
Campfire Pizza Pockets: Troubleshooting & Tweaks
It took me a few tries to realize that using too much sauce or overloading toppings makes sealing the edges nearly impossible. Less is more, and a lighter touch yields pockets that crisp up beautifully with no leaks. Occasionally, I’ve swapped in pesto for the pizza sauce—it adds a vibrant, herby twist without overpowering the bread and cheese.
Pie Iron Gear Tips
Choosing a well-seasoned or nonstick pie iron keeps frustration at bay and means you don’t spend half your campfire time cleaning. If you’re prepping lots of pockets, it helps to use two irons at once, keeping everyone from getting hangry as they wait. Tongs or heat-resistant gloves are absolutely worth it for safe turning and opening, especially if you’ve got young helpers eager to flip their own.
Pizza Pocket Pairings and Easy Swaps
On hot days, nothing beats pairing these with a pitcher of homemade lemonade or crisp apple slices. When we want to dress it up, a fresh green salad on the side makes the meal memorable without any fuss. Adaptations are only limited by your imagination—just keep the fillings modest and let the fire work its magic.
- Keep a roll of paper towels handy, as the melted cheese will test your napkin supply.
- Try gluten-free bread for friends with allergies—no one feels left out this way.
- Don’t forget to swing the iron open away from your face; steam can surprise you!
 Save to Pinterest
 Whether it's around a campfire or at home on the stove, these pie iron pizza pockets bring people together with minimal fuss. May your next batch be as full of laughter and good company as mine always are.
Frequently asked questions about this recipe
- → How do I avoid soggy bread?
-
Butter the outside of each slice for a crisp crust, keep sauce portions light, and drain any watery toppings. Cook over moderate heat so the bread crisps before fillings become too runny.
- → Can I use gluten-free or alternative breads?
-
Yes. Choose sturdier gluten-free slices or thicker sandwich bread. Press edges firmly when sealing and shorten cook time slightly if the bread browns faster.
- → What are good topping combinations?
-
Classic mozzarella and pepperoni is reliable. Try cooked sausage with peppers, mushrooms and olives, or fresh basil with sliced tomatoes and a drizzle of pesto for brightness.
- → How can I tell when a pocket is done?
-
Look for an even golden-brown exterior on both sides and cheese that has melted and become gooey inside. A quick peek at the seam for bubbling filling helps too.
- → Stovetop or campfire—any tips?
-
Preheat the pie iron and use medium heat. Over coals keep the iron off direct flames and flip once; on the stovetop use even, steady heat for consistent browning.
- → How should leftovers be stored and reheated?
-
Cool completely, wrap or store airtight in the fridge up to 48 hours. Reheat in a skillet or oven to restore crispness rather than the microwave.
