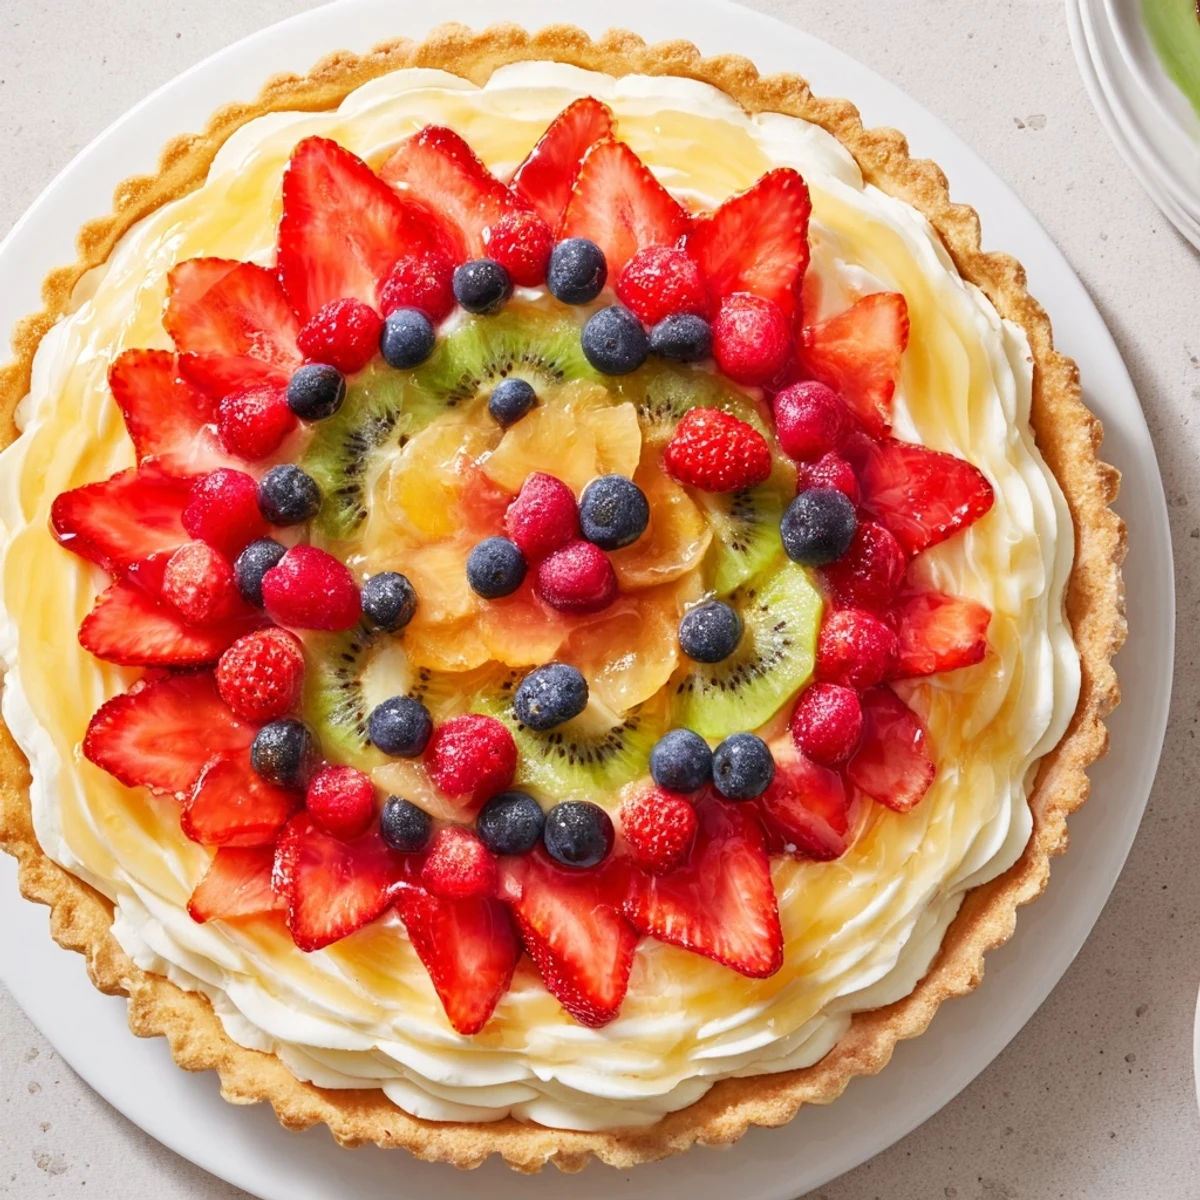
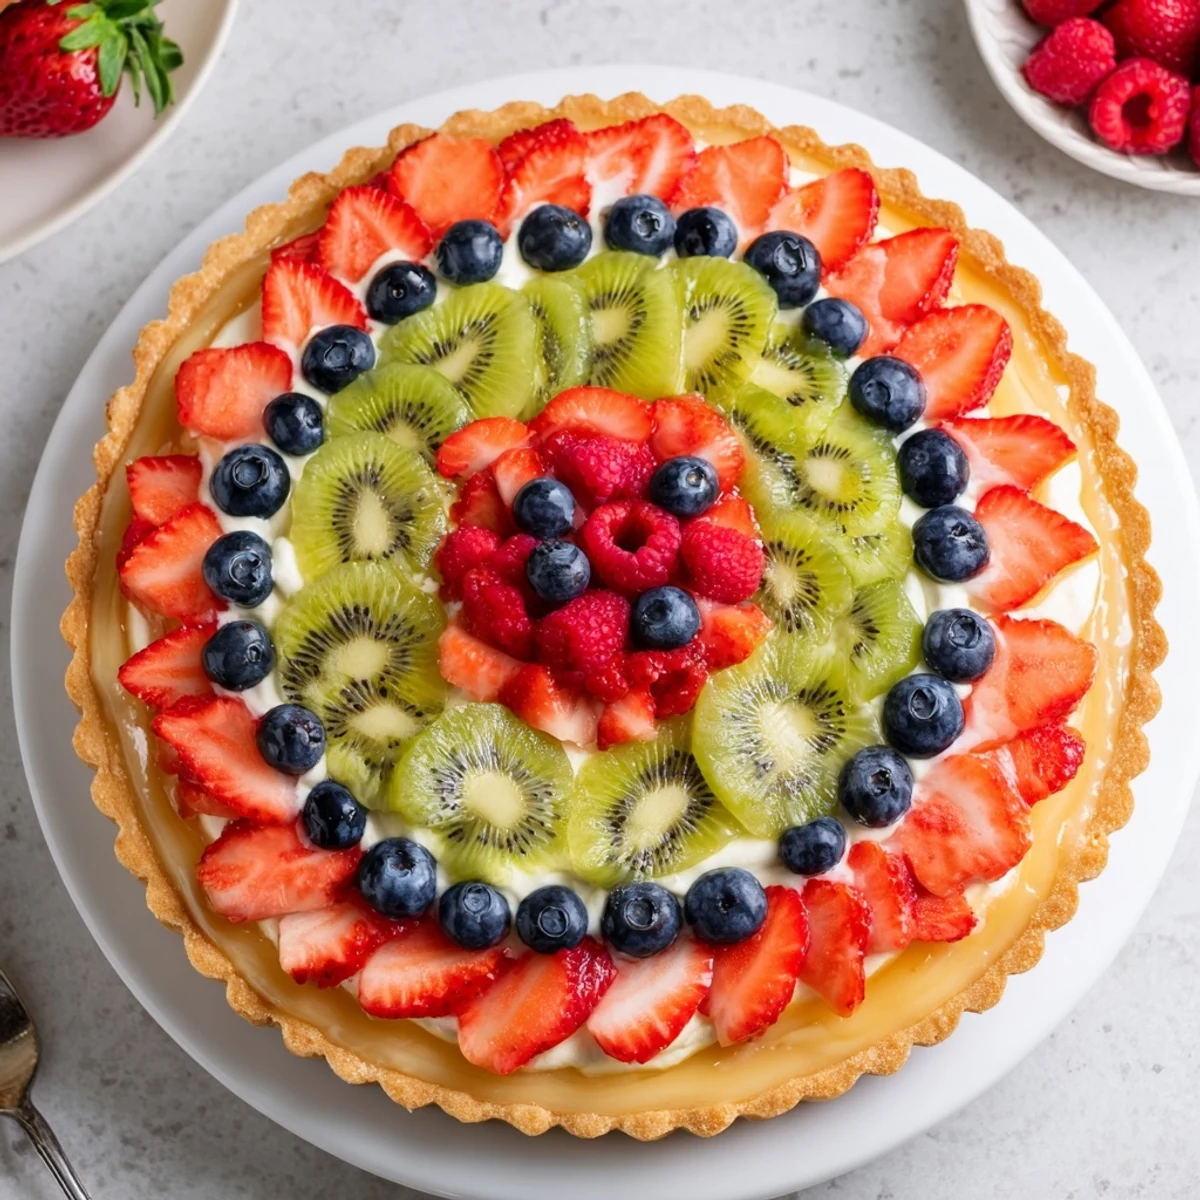
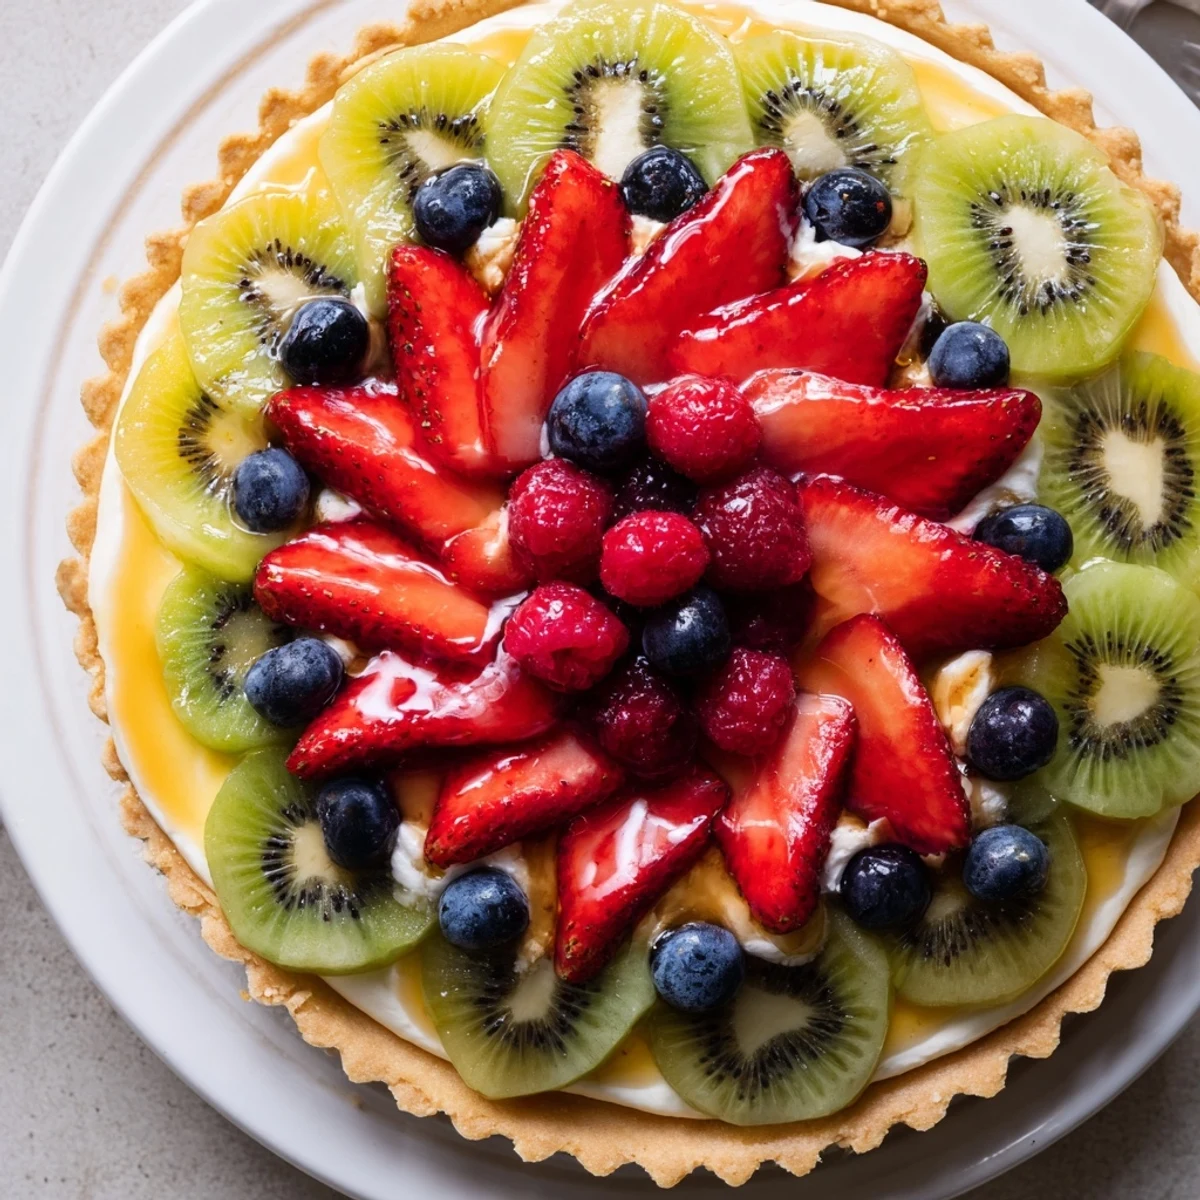
 Save to Pinterest
 Press a chilled buttery crust into a 9-inch tart pan, blind-bake until golden, then cool. Whisk mascarpone with powdered sugar and vanilla, fold in softly whipped cream for a light, stable filling. Spread into the cooled shell, arrange strawberries, blueberries, kiwi and raspberries, and brush warmed apricot jam over fruit for shine. Chill to set and slice. Serves 8; includes chilling time.
The moment I first baked this fruit tart, the kitchen felt electric with the scent of butter and vanilla swirling through the air. There was a playful energy as strawberries tumbled onto the counter, leaving pink juice stains everywhere. I didn’t realize how the cool mascarpone would lure everyone right to the table before the tart had even finished chilling. This dessert turned what could have been an ordinary evening into something vibrant and festive.
One sunny Saturday, I tried out this tart for a midsummer family birthday. Berry juice streaked my apron while my niece fussed over how to arrange the kiwi slices just so. We argued about spiral patterns versus stripes, but ended up laughing and sneaking extra berries as we decided. Even the not-so-perfect arrangements disappeared within minutes after dinner.
Ingredients
- All-purpose flour: Essential for creating a sturdy yet tender crust – I’ve found sifting it first avoids clumps.
- Unsalted butter: Chilled, cubed butter ensures the crust bakes up crisp and flaky; resist the urge to overmix.
- Granulated sugar: Just enough sweetness for the shell without overshadowing the fruit.
- Egg yolk: Adds richness and structure; I separate it using the shell halves instead of fancy gadgets.
- Cold water: Be precise – too much makes the dough sticky and tough, just splash in a tablespoon at a time.
- Pinch of salt: Heightens the flavor of both butter and filling in a way you hardly notice until it’s missing.
- Mascarpone cheese: Rich and tangy, at room temperature it blends effortlessly; never skip the warming step.
- Heavy cream: Whipped to soft peaks, it makes the filling airy and silky; I watch for just the right curl on the whisk.
- Powdered sugar: Lowers the risk of graininess in the creamy layer and adds a gentle sweetness.
- Vanilla extract: A splash makes the entire tart taste like happiness; go for real extract if you can.
- Lemon zest (optional): Tiny flecks brighten and balance the mascarpone’s richness, especially if your fruit is very sweet.
- Strawberries, blueberries, kiwi, raspberries: Use what's freshest – mixing textures and colors is the secret to a beautiful tart, and any berry will do.
- Other seasonal fruits (optional): Mangoes, peaches, or blackberries switch things up and keep the dessert ever-interesting.
- Apricot jam (for glaze): Melting it with water creates a glossy sheen; this is the trick to a jewel-like finish on bakery tarts.
Instructions
- Prep the tart pan:
- Butter every corner of your tart pan and feel for any rough spots with your fingertips; this makes sure nothing sticks when you try to unmold later.
- Make the crust dough:
- Rub cold butter into the flour with your fingertips until it almost disappears, and listen for the soft, sandy sound – add egg yolk and water and stop mixing the second it comes together.
- Shape and chill:
- Press the dough firmly but gently into the pan, patching any thin spots, then cover and chill it so the crust won't shrink.
- Blind bake:
- Scatter parchment and baking beans over the dough and slide it into the oven; you'll hear a faint sizzle as it sets, then remove the beans so the edges turn golden for the final few minutes.
- Mix the mascarpone filling:
- Combine mascarpone, sugar, vanilla, and lemon zest, scraping down the bowl so it’s silky and smooth; whip cream separately to soft, floppy peaks before gently folding it into the cheese so no air gets knocked out.
- Fill and decorate:
- Spoon the cream into the cooled crust and spread with a swirled flourish; recline the fruit on top, alternating colors and shapes, letting it be as whimsical or as orderly as you like.
- Glaze the fruit (optional):
- Warm jam and water together, then brush it gently over the fruit to make it shine like stained glass; don’t rush, so you coat every glossy edge.
- Chill before serving:
- Let your tart rest in the fridge for at least thirty minutes so the flavors meld and the filling sets perfectly for slicing.
 Save to Pinterest
 The first time I served this at a potluck, nobody believed it was homemade until they spotted the unevenly cut fruit (my signature move). A friend chased me down later in the evening for the secret to the cream, and I knew this tart had just become a social icebreaker.
How to Make It Your Own
Some of the most memorable versions have come from just using whatever fruit I had left in the fridge. Swapping in peaches or blackberries gave completely fresh results, and one winter, a sprinkle of chopped mint on oranges was a total game-changer. The tart is a canvas and often ends up looking different each time I make it.
Shortcuts and Swaps That Work
If you’re pressed for time, using store-bought pie dough can rescue the day and still yield excellent results. I sometimes even swap in whipped Greek yogurt for part of the cream if I want a lighter filling. No matter the changes, a little extra vanilla or lemon zest always wakes up the flavors.
Serving and Storing Tips
Serving the tart slightly chilled keeps each slice neat, and the colors bright. I learned that leftovers (if you manage any) last well loosely covered in the fridge for a day or two, but the crust is best on day one. Fruit tends to glisten best when just-glazed, so add the shiny finish close to serving time for maximum effect.
- Use a serrated knife for neatest slices.
- Let the tart sit out for 15 minutes before serving if very cold from the fridge.
- Keep extra fruit on hand for patching up accidental nibbles before sharing.
 Save to Pinterest
 This fruit tart always brings people together, whether it’s the colors or the creamy filling that draws them in first. I hope your creation brightens the table and brings a few smiles your way, too.
Frequently asked questions about this recipe
- → How do I keep the crust crisp with a creamy filling?
-
Blind-bake the crust until golden and fully cool it before filling. For extra barrier, brush a thin layer of melted chocolate or neutral glaze into the cooled shell to prevent sogginess from the filling.
- → Can mascarpone be stabilized for a lighter filling?
-
Yes — beat mascarpone with powdered sugar until smooth, then fold in softly whipped heavy cream. Whipping the cream to soft peaks before folding helps lighten texture while maintaining stability.
- → Which fruits work best for the topping?
-
Firm berries and sliced fruits like strawberries, blueberries, kiwi and raspberries hold shape and color well. Use seasonal fruit for best flavor and balance of sweetness and acidity.
- → How should I apply the glaze for a glossy finish?
-
Warm apricot jam with a little water until smooth and strain if needed. Use a pastry brush to gently coat the arranged fruit, working quickly to preserve fresh appearance without saturating the fruit.
- → Can components be prepared ahead?
-
Yes. Bake and cool the crust a day ahead and keep covered. Prepare the mascarpone filling and refrigerate, then assemble and glaze on the day of serving for best texture and freshness.
- → How should leftovers be stored?
-
Cover the tart loosely and refrigerate; it keeps 2–3 days. Note that the crust will soften over time, so for maximum crunch, store crust and filling separately when possible.
